Slip Receipt Entry
The Payment Code Slip Receipt Entry Page (Customize Slip Receipt) allows you to customize the payment code information that prints on the body of a slip receipt. For example, a Bond payment can be itemized to print specific information on the receipt. To access this page, go to Maintenance > new world ERP Suite > Revenue Collection > Payment Codes and refer to the steps below.
The Revenue Collections Slip Receipt Setup feature allows you to include detailed information on the header and footer of a standard receipt and customize the information that prints on the receipt. This is useful if several departments in your organization require different information be printed on their slip receipts. To access this page, go to Maintenance > new world ERP Suite > Revenue Collection > Slip Receipt Setup.
Payment Code Slip Receipt Entry
Follow the step below to customize the text that appears on the body of the receipt if you are on the Payment Codes page:
- Go to Maintenance > new world ERP Suite > Revenue Collection > Payment Codes.
- Create or edit an existing payment code that utilizes the slip receipt. The Customize Slip Receipt button is only enabled when the payment code type of New World Receivables is selected after you click Save.
- Click Customize Slip Receipt. The Payment Code Slip Receipt Entry page opens.
- Click New and the Add Field pop-up window opens where you can define the fields and labels that will appear in the body of the receipt.
- Select the Field in the drop-down list that should appear in the body of the receipt. If data exists in the system for that field, the information prints on the receipt. The available fields vary based on the value selected in the Transaction Reference Number Format field when defining the payment code.
Note: NOTE: For the Free Text field option, you can only print 40 characters per line on the receipt. If you need to print more than 40 characters, you can use this field more than once for the text that needs to appear on the receipt.
- Type the label name in the Label text box if you want a label or heading to appear on the receipt (for example, Licensee #:) next to the data in the field.
- In Sequence, type a number to indicate the order in which the field should appear in the body on the receipt.
- Click OK. The grid is populated with the information you entered.
Slip Receipt Header/Footer Entry
Go to Slip Receipt Setup for instructions on how to customize the text that appears on the header and/or footer of the receipt if you are on the Slip Receipt Setup page.
Edit Slip Receipt Entry Fields
The following are instructions for editing fields on the slip receipt in the header, footer, or body (payment codes) sections.
To edit an existing field, click the Edit ( ) icon next to the field name. The Edit Field pop-up window appears where you can update the information as needed and click OK.
To delete a field, click the Delete ( ) icon next to the field name. Click OK to confirm the deletion.
To change the sequence of a field, edit the field and type the new number in Sequence. The entire list of fields below the renumbered field is rearranged sequentially based on the sequence number you entered.
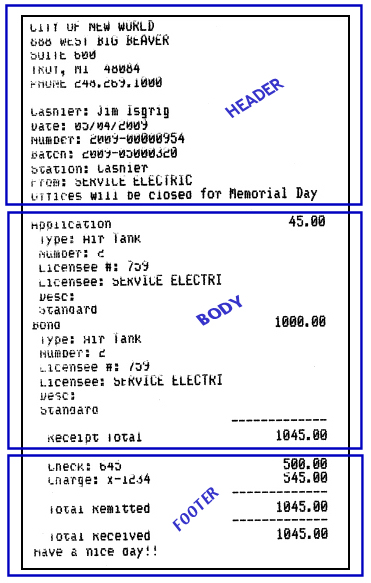
Below is an example of how the header, body, and footer text display on a receipt. The blue text and borders do not print on the receipt; they are used here to highlight the sections.
See Also